Introduction
In my previous blog post, I showed you how we at ST6 crafted our AWS Organization and the reasoning behind our choices. I also explained that we use Terraform and that all repeatable configuration is modularized. Now I will walk you through the solution.
I'm not going to cover Terraform basics, but having a good understanding of providers and modules is essential for the solution. So, let's refresh our knowledge before we get to the good stuff.
Providers
A provider in Terraform is responsible for API interactions and authentication. Each public cloud has a separate provider.
The shortest way you can define an AWS provider in Terraform is:
# File: ./main.tf

provider "aws" {}
It's best practice to lock the provider version so that you are in control of the updates. I have seen how an update can cause recreation of resources. To do that you have to add the version argument to the provider:
# File: ./main.tf

provider "aws" {
  version = "= 2.18.0"
}
Now that your provider is defined and the version is locked, you need to initialize it by executing terraform init.
A good question at this point would be:
How does Terraform know which region and what credentials to use?
There are several ways to provide credentials to Terraform:
-
Static credentials
You should avoid static credentials at all cost. Having credentials hardcoded is against best practices as you risk a leak. You don't want your resources to be destroyed or sensitive data to be stolen.
-
Environment variables
Environment variables are one mechanism you can use. You just need to define
AWS_ACCESS_KEY_ID,AWS_SECRET_ACCESS_KEYandAWS_DEFAULT_REGIONenvironment variables in your execution environment. -
Credentials file
The AWS CLI can store credentials in a configuration file. On macOS and Linux, the default file location is
$HOME/.aws/credentials. To generate this file, you can create it manually or create one by executingaws configureand following the steps on the CLI prompts. -
ECS and CodeBuild Task Roles
Terraform can use IAM Task Roles that are configured on ECS and CodeBuild. Terraform checks for the
AWS_CONTAINER_CREDENTIALS_RELATIVE_URIenvironment variable. If it doesn't find this variable it will try to use the EC2 Instance Profile. -
EC2 Instance Profile with IAM Role
An EC2 instance can assume an IAM Role if it is configured with an EC2 Instance Profile. The Go SDK (which is used by the Terraform AWS Provider) makes an API call to the metadata endpoint. If you are running Terraform on an EC2 instance, this is the preferred method as credentials are rotated. This approach reduces the chance of leakage.
-
Assume an IAM Role
Terraform can also assume an IAM Role. You just need to supply it with a Role ARN. Keep in mind that to assume a role you need to be already authenticated.
One important thing to point out is that you can have more than one provider configured. You can achieve this with provider aliases. When a provider doesn't have an alias argument, then it's considered the default provider which is named aws. Here is an example of a multiple provider definition:
# File: ./main.tf

provider "aws" {
  version = "= 2.18.0"
}

provider "aws" {
  alias   = "secondary"
  version = "= 2.18.0"
  assume_role {
    role_arn = "arn:aws:iam::123456789012:role/TerraformRole"
  }
}
In this example configuration, we have a default provider aws and a second provider named aws.secondary. The default AWS provider is used to assume the IAM Role TerraformRole in account 123456789012.
How do aliases help me?
Think of aliases as the different AWS accounts and regions that you have. When you define a resource, it uses the default provider unless you add the provider argument. This means that you can easily create two resources in different accounts and/or regions.
# File: ./main.tf

provider "aws" {
  version = "= 2.18.0"
}

provider "aws" {
  alias   = "secondary"
  version = "= 2.18.0"
  assume_role {
    role_arn = "arn:aws:iam::123456789012:role/TerraformRole"
  }
}

resource "aws_iam_user" "user1" {
  name = "user1"
}

resource "aws_iam_user" "user2" {
  name     = "user2"
  provider = aws.secondary
}
In this example, one IAM User will be created in the default provider account and/or region and one in the secondary.
One interesting thing is that you can dynamically construct the providers. This means that you can create a new AWS account, construct the provider role ARN and create resources in the new account with a single step.
# File: ./main.tf

provider "aws" {
  version = "= 2.18.0"
}

provider "aws" {
  alias   = "secondary"
  version = "= 2.18.0"
  assume_role {
    role_arn = "arn:aws:iam::${aws_organizations_account.secondary.id}:role/OrganizationAccountAccessRole"
  }
}

resource "aws_organizations_account" "secondary" {
  name  = "secondary"
  email = "secondary@john.doe"
}

resource "aws_iam_user" "user" {
  name     = "user"
  provider = aws.secondary
}
The above example will create a new AWS Account and an IAM User in it. Please note that there needs to be an AWS Organization configured for this example to work.
Modules
A Terraform module is a group of resources that are bundled together. They are used to abstract repeatable configuration. To create a module, you have to place its .tf files in a directory separated from the main working directory. Here is an example of a module file structure.
.
├── modules
│   └── ec2_instance
│       └── main.tf
└── main.tf
Terraform modules act just like a resource. They too have arguments and attributes. All variables that you define in the module .tf files are treated as a module argument and the outputs are treated as attributes. Below you can see an example of what a typical module configuration looks like:
# File: ./main.tf

provider "aws" {
  version = "= 2.18.0"
}

module "ec2_instance" {
  source = "./modules/ec2_instance"
  ami_id = "ami-1234abcd"
}

output "ec2_instance_id" {
  value = module.ec2_instance.id
}
# File: ./modules/ec2_instance/main.tf
variable "ami_id" {}
variable "instance_type" {
description = "(Optional) EC2 instance type."
default = "t2.micro"
}
resource "aws_instance" "instance" {
ami = var.ami_id
instance_type = var.instance_type
}
output "id" {
value = aws_instance.instance.id
}In this example, we instantiate the ec2_instance module with an AMI ID: ami-1234abcd. Then we output the EC2 instance ID which is available as a module attribute.
Everything looks good so far. We have an easy way to abstract a large and/or repeatable configuration. One question might have popped in your mind.
Do Terraform modules support different providers?
The answer is yes. You can override a provider for a module.
# File: ./main.tf


provider "aws" {
  version = "= 2.18.0"
}

provider "aws" {
  alias   = "secondary"
  version = "= 2.18.0"
  assume_role {
    role_arn = "arn:aws:iam::123456789012:role/TerraformRole"
  }
}

module "default_ec2_instance" {
  source = "./modules/ec2_instance"
  ami_id = "ami-1234abcd"
}

module "secondary_ec2_instance" {
  source = "./modules/ec2_instance"
  ami_id = "ami-1234abcd"
  providers = {
    aws = "aws.secondary"
  }
}
The module code can remain unchanged from our previous example, because we are overriding the default provider with aws = "aws.secondary".
This example creates two EC2 instances in two AWS accounts.
You can even pass multiple providers to a module, which you have to map to internal aliases.
# File: ./main.tf

provider "aws" {
  version = "= 2.18.0"
}

provider "aws" {
  alias   = "secondary"
  version = "= 2.18.0"
  assume_role {
    role_arn = "arn:aws:iam::${module.secondary.id}:role/OrganizationAccountAccessRole"
  }
}

module "secondary" {
  source = "./modules/account"
  name   = "secondary"
  email  = "secondary@john.doe"
  providers = {
    aws = "aws"
    aws.account = "aws.secondary"
  }
}
# File: ./modules/account/main.tf
provider "aws" {
alias = "account"
}
variable "name" {}
variable "email" {}
resource "aws_organizations_account" "secondary" {
name = var.name
email = var.email
}
resource "aws_iam_account_password_policy" "strict" {
minimum_password_length = 8
require_lowercase_characters = true
require_numbers = true
require_uppercase_characters = true
require_symbols = true
allow_users_to_change_password = true
provider = aws.account
}In this example, we are passing two providers to the module. The default aws provider is mapped to the default provider for the module. The secondary provider is mapped to a module provider with alias account. Using this configuration Terraform will create a new AWS account and configure its IAM Account password policy once the account creation is complete.
Putting the solution together
So how does this all fit together?
As described in my previous blog post, we decided to have a module for each repeatable configuration. This includes a new organizational unit, AWS account, IAM group, and IAM user. The Terraform configuration is executed in our master account. The structure of such a configuration looks like:
.
├── modules
│   ├── account
│   │   ├── main.tf
│   │   ├── outputs.tf
│   │   └── variables.tf
│   ├── group
│   │   ├── main.tf
│   │   ├── outputs.tf
│   │   └── variables.tf
│   ├── ou
│   │   ├── main.tf
│   │   ├── outputs.tf
│   │   └── variables.tf
│   └── user
│       ├── main.tf
│       └── variables.tf
├── main.tf
└── variables.tf
The account module is responsible for creating a new AWS account and applying a baseline configuration in it. This means that we need to pass two providers to the module. One will be using the master account (default) provider to create the AWS account and a secondary provider that will be dynamically constructed to apply the baseline configuration in the new account. This module needs to output the account ID so that it can be referenced by the provider.
The ou module is pretty self-explanatory. It only uses the default provider to create a new OU (Organizational Unit) with the corresponding SCP. This module needs to output the OU ID so that it can be used when creating new AWS accounts in it.
Modules group and user are used only for the Login account (you can refer to the previous blog post for the organization structure). This means that the modules are configured with just one provider. The group module is responsible for creating IAM Groups for each project with the corresponding IAM Policy. The user module controls our IAM Users and their group membership. You can output the group name from the module so that you can reference it when you add users to it.
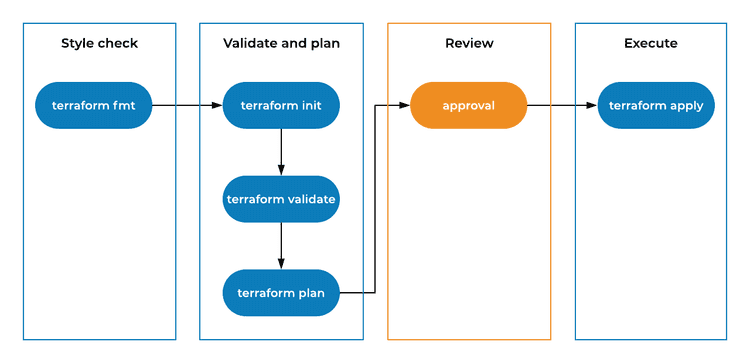
Now that we have the configuration, let's talk about how you should execute it. Here is how our execution flow looks like:
When you start to collaborate on a Terraform configuration, you need to have a clear process. I have seen situations, where two people execute Terraform in different Git branches which causes configuration collisions. If you want to use branching, make sure you only go as far as the validation and plan step. In some cases like backend updates, you should only do a style check, as you can unintentionally apply the changes by executing terraform init.
There should be a single source of truth for the execution of all Terraform commands and the best place for this task is the automated CI/CD pipeline. I also like to use AWS managed services as much as I can (as long as they fulfill my needs). So naturally, AWS CodePipeline is my first choice for this. Our pipeline is separated in two stages, one for creating a plan and another to apply the plan. There is a manual approval step after the plan is generated and reviewed. We also execute the plan phase when a pull request is created or updated.
You should consider using the state locking feature of Terraform in order to limit concurrent executions. If you store your state in AWS S3, you can create a DynamoDB table and use it for lock tracking.
Final thoughts
We started with an ambitions goal to create an AWS multi-account setup that is secure and maintainable. The final solution is a Terraform configuration that is easy to understand and modify because we didn't overengineer it. We have used many of the AWS security best practices which makes our setup secure. Another benefit is that we use infrastructure as code and version control. This makes it easy to keep a track of the changes that were done to the organization (including user management). We also limit configuration conflicts by using a pipeline for the execution of Terraform.
I hope you enjoyed this series and you found something new that can make your life easier.


